Positive Pay
How It Works
Accessing Positive Pay
Follow these steps if you are an authorized user for Positive Pay.
- 1Log into business online or mobile banking1
- 2Via online banking, select the ‘Checks & Deposits’ tab and then ‘Positive Pay’
- 3Via mobile banking, select ‘Approvals’ then ‘Positive Pay Exceptions’
Upload an Issued Check File
- 1
Select the ‘Overview’ tab of Positive Pay
- 2
Under ‘Import a File,’ select ‘Choose File’
- 3
Select a saved file from your computer; it must be in .csv comma delimited format
- 4
Select the template from the drop-down menu. If you don’t have a template created, contact our team for support.
- 5
Click ‘Next’
- 6
If the file is uploaded successfully, a green banner will appear. If errors exist, a red banner will appear, indicating the errors.

Manual Check Entry
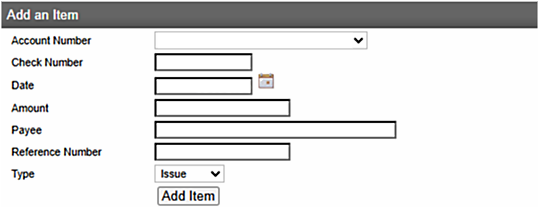
- 1Select the ‘Overview’ tab of Positive Pay
- 2Under ‘Add an Item,’ select the account number for the check being entered
- 3Enter the check information (i.e., check number, amount, payee)
- 4Skip the reference number
- 5
Under Type, select ‘Issue’ for new checks
- 6Select ‘Add Item’
- 7If the check is entered correctly, you will see a green banner indicating it was successful. If errors exist, a red banner will appear, indicating the errors.

Frequently Asked Questions
Additional Resources
1 Mobile banking can be used to decision exceptions; other Positive Pay functionality requires Online Banking access through a web browser.

